Order to Cash full cycle and Techno-Functional flow in R12
The Order to Cash Process flow starts with entering the order with a standard item into system. When you enter an order, the item are validated in oracle inventory, the price is calculated for the items using the pricing engine; the availability of the items are checked and may be reserved. Once all the required fields are entered on both the header and the lines, you can book the order. When you click on the Book Order button, the API OEXUBOKB.pls, checks if the order is eligible for booking. If eligible the order is booked and the order header status would change to booked. The next step is the pick release with which you move the items from the warehouse to the staging area. The next step is to ship confirm, to indicate that the items are loaded on to the carrier from the staging area. When you run Ship Confirm, the system decrements inventory and updates sales order line status. This information is then transferred through the Auto Invoice to Account Receivables for invoicing. Then you sent the invoice to your customer for the items shipped and then perform the cash management and bank reconciliations.
Order Management receives detailed item information from the Inventory application and price list information from the Pricing application. Orders and returns can be entered manually or imported through an EDI, CRM, or external source. Once in the system the order is ready to be pick released and shipped, if needed by the Shipping application. It can then proceed through the Auto Invoice program into the Oracle Receivables application to be invoiced. All of the accounting information is transferred to the General Ledger by the Inventory and Receivables applications.
The required fields to enter on the sales order header are the customer name or number and order type. Other values such as Ship-To Address, Bill-To Address, Shipping Method, and Price List default. The order number is generated based on the order type. The required fields to enter on the sales order lines are Ordered Item and Quantity. Again, based on defaulting rules and setups in Pricing, Inventory and Shipping, the other values would default on the sales order line.
Setup steps for executing the Order to Cash flow with a standard item:
· Prior to order entry, the items should be created / defined in inventory module using the master items screen and assigned to the shipping organization. Check the blog post for the related setups
· Add the item to the price list or create a new price list.
· Transaction Type must be defined
· Document Sequence must be assigned to the document category.
· Customers must be defined
· Salespersons must be defined
· Shipping Roles should be granted to the user.
· Ensure that the items are available in your shipping sub inventory or perform miscellaneous transactions to augment the same.
Following are some useful related links:
Check the blog post for tables involved in various stages of O2C
Check the blog post on queries involved in Order management
Order to Cash flow with tables involved in various stages:
Order to Cash flow with statuses at various stages:
All possible flow statuses of the order/line:
• OE_ORDER_HEADERS_ALL.flow_status_code: Order Header (Entered) àBooked Order (Booked) à Closed Order (Closed)
• OE_ORDER_LINES_ALL.flow_status_code: Order Line (Entered) à Booked Order (Awaiting Shipping) à Pick Released(Picked/Staged) à Ship Confirmed (Shipped) à INV/OM interfaced (Fulfilled)à Close Order (Closed)
1. Enter the order header, line details and Book it:
Responsibility: Order Management Super User, Vision Operations (USA)
Navigate to Orders, Returns à Sales Orders
Open the Sales Orders Window
Order Number: 66413
Open the Sales Orders Window
Order Number: 66413
2. Schedule order:
· Check if the order lines are scheduled or not. If any of the order line is in BOOKED status, it means that the order line is not yet scheduled.
· Run the Schedule Order concurrent program to schedule the order. After the concurrent program is scheduled the order line will move to Awaiting Shipping status.
· Still if the order lines do not go to Awaiting Shipping, check for any holds on the order line/ header. Release the holds (if any) and re-run theSchedule Order program.
· You can even schedule the order line in the following way: Right click on the order line and progress the line to schedule it. Check the OM scheduling related setups
Order tables:
OE_ORDER_LINES_ALL.visible_demand_flag: visible_demand_flag= Yes lines will be made available as Demanded to Planning
Shipping tables: The shipping tables get populated after order scheduling.
WSH_DELIVERY_DETAILS.released_status: monitors the shipping process of the order line
WSH_DELIVERY_ASSIGNMENTS: Assigns delivery details to a delivery and/or a parent delivery detail.
Once the order is booked from the application, following changes occur in the backend
§ OE_ORDER_HEADERS_ALL (flow_status_code as BOOKED, booked_flag updated to Y)
§ OE_ORDER_LINES_ALL (flow_status_code as AWAITING_SHIPPING, booked_flag updated Y)
§ Since the order is now booked, delivery details of the order are created in WSH_DELIVERY_DETAILS table. WSH_DELIVERY_DETAILS has delivery lines and LPNs.
OOL.line_id = WDD.source_line_id
§ These delivery details information can been viewed form ‘Shipping Transactions Form’ and the delivery status in the application will be as ‘Ready to Release’
§ WSH_DELIVERY_DETAILS.released_status =’R’
§ WSH_DELIVERY_DETAILS.Release_Status can have any of the below valid values
§ WSH_DELIVERY_ASSIGNMENTS (WDA) assigns delivery details to a delivery and/or a parent delivery detail (LPN).
WDA.delivery_detail_id = WDD.delivery_detail_id
§ WSH_DELIVERY_ASSIGNMENTS.delivery_id will be NULL as still pick release operation is not performed as final delivery is not yet created.
§ At the same time when order is booked ‘Demand interface program’ is triggered in the background and demand of the item with specified quantity is created and these demand information is stored in MTL_DEMAND.
MTL_DEMAND.demand_source_line = OOL.line_id
3. Pick Release the Sales Order
· Navigate to the Shipping Transaction Form (Shipping à Transactions)
Enter the following in the Query Manager window and click Find
From Order Number = 66413 To Order Number = 66413
· You can find the data in Shipping transaction screen (WSH shipping tables) only when order is scheduled.
· On the Shipping Transaction Form select Launch Pick Release from the Action menu and click on GO button.
· If Auto Pick confirm is not selected while pick release, then we have to manually do the transact move order process. In fact pick confirm also triggers the transact move order process in which the inventory is moved from item sub inventory to staging area.
Order line status becomes ‘Picked’ on Order and ‘Staged/Pick Confirmed’ on Shipping Form.
Order line status becomes ‘Picked’ on Order and ‘Staged/Pick Confirmed’ on Shipping Form.
§ MTL_MATERIAL_TRANSACTIONS_TEMP (Record gets deleted from here and gets posted to MTL_MATERIAL_TRANSACTIONS)
§ OE_ORDER_LINES_ALL.flow_status_code =’PICKED’
§ MTL_MATERIAL_TRANSACTIONS is updated with Sales Order Pick Transaction
MMT.trx_source_line_id = OOL.line_id
§ MTL_TRANSACTION_ACCOUNTS is updated with accounting information
§ WSH_DELIVERY_DETAILS. released_status=‘Y’ (‘Released’)
§ WSH_DELIVERY_ASSIGNMENTS, MTL_ONHAND_QUANTITIES are updated accordingly
Note: Pick Confirm step can be eliminated if ‘Auto Pick Confirm’ is selected as ‘YES’ while performed manual pick release. If Pick release is done through shipping transactions form and if you want to perform auto pick confirm then picking rules setup has to be done.
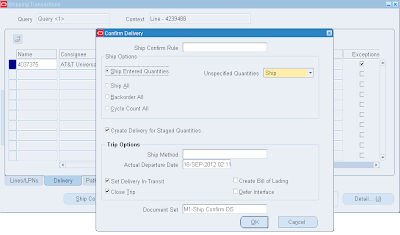
4. Ship Confirm the Sales Order
· Navigate to the Shipping Transaction Form (Shipping à Transactions)
· Enter the following in the Query Manager window and click Find
From Order Number = 66413 To Order Number = 66413
· On the Shipping Transaction Form navigate to the Delivery Tab and select Ship Confirm from the Action menu and click on GO button. Ship confirm process triggers the Interface Trip Stops concurrent program.
o OE_ORDER_LINES_ALL.flow_status_code =‘SHIPPED’
o WSH_DELIVERY_DETAILS. released_status=‘C’ (‘Shipped’)
o Data from MTL_TRANSACTIONS_INTERFACE is moved to MTL_MATERIAL_TRANACTIONS and MTL_MATERIAL_TRANSACTIONS is updated withSales Order Issue transaction.
o Data is deleted from MTL_DEMAND, MTL_RESERVATIONS and WSH_NEW_DELIVERIES
o Item reduced from MTL_ONHAND_QUANTITIES
MTL_TRANSACTION_ACCOUNTS is updated with accounting information.
Following are the pick release status:
Table: WSH_DELIVERY_DETAILS
Column: RELEASED_STATUS
Possible Values:
B: Backordered- Line failed to be allocated in Inventory
C: Shipped -Line has been shipped
D: Cancelled -Line is Cancelled
N: Not Ready for Release -Line is not ready to be released
R: Ready to Release: Line is ready to be released
S: Released to Warehouse: Line has been released to Inventory for processing
X: Not Applicable- Line is not applicable for Pick Release
Y: Staged- Line has been picked and staged by Inventory
Check the blog post for the detailed pick release status
· Verify the details on the Confirm Delivery window and click OK and close the window.
5. Run the Interface Trip Stop – SRS Program
· The Interface Trip Stop (ITS) will be trigger at the time of Shipping if check box “Defer Interface” is not check. ITS can also be executed from concurrent request.
Interface Trip Stop has two main components:
Interface Trip Stop has two main components:
1. Update the Order Management Data (oe_order_lines_all)
2. Trigger the Inventory Interface (to Update the Inventory tables)
· ITS updates the following fields on oe_order_lines_all table:
· Shipped_quantity
· Shipping_quantity
· Actual_shipment_date
· Inventory Interface will be trigger only if the first part, that means related to OM has successfully completed and flag OE_INTERFACED_FLAG = ‘Y’ on WSH_DELIVERY_DETAILS. If value of this flag is N/P then Inventory Interface will never be triggered. And even if you try to submit the Inventory Interface from SRS, delivery detail with oe_interfaced_flag =’N’ will never be picked up.
o oe_interfaced_flag = Y -- signifies ITS has interfaced shipping data to OM
o inv_interfaced_flag = Y -- signifies ITS has interfaced shipping data to INV
Navigate to Shipping Interfaces window (Shipping à Interfaces à Run)
Select the Interface Trip Stop - SRS Program from the LOVs
On the parameters window enter
Mode = All
Click on the OK button and then on the Submit button:
6. Run the Master AutoInvoice Program
Navigate to the Run AutoInvoice window, (Interfaces à AutoInvoice)
Select the AutoInvoice Master Program from the LOV
On the parameters window enter
Invoice Source = ORDER ENTRY
Default Date = Enter Today’s Date
(Low) Sales Order Number = 66413
(High) Sales Order Number = 66413
Then click OK and Submit button.
7. View the Transaction created by the AutoInvoice Program
· Navigate to the Additional Line Information window, (Orders, Returns àOrder Organizer)
· On the Find Order window, query your order number = 66413
· On the Order Organizer window, navigate to Lines Tab and click on Actions button and select the Additional Line information and click OK.
8. On the Additional Line Information window, navigate to Invoices / Credit Memos Tab and click on the Invoice Details button. This would open Transactions window, where you can see the invoice details.
Following is an important Query which gives the joining between OM, WSH, AR Tables
SELECT ooh.order_number
,ool.line_id
,ool.ordered_quantity
,ool.shipped_quantity
,ool.invoiced_quantity
,wdd.delivery_detail_id
,wnd.delivery_id
,rctl.interface_line_attribute1
,rctl.interface_line_attribute3
,rctl.interface_line_attribute6
,rct.org_id
,rct.creation_date
,trx_number
,rctl.quantity_ordered
,rct.interface_header_context
FROM oe_order_headers_all ooh
,oe_order_lines_all ool
,wsh_delivery_details wdd
,wsh_new_deliveries wnd
,wsh_delivery_assignments wda
,ra_customer_trx_all rct
,ra_customer_trx_lines_all rctl
WHERE ooh.header_Id=ool.header_id
AND wdd.source_header_id=ooh.header_id
AND wdd.delivery_detail_Id=wda.delivery_detail_id
AND wda.delivery_id=wnd.delivery_id
AND rctl.interface_line_attribute1=to_char(ooh.order_number)
AND rctl.interface_line_attribute6=to_char(ool.line_id)
AND rctl.interface_line_attribute3=to_char(wnd.delivery_id)
AND rctl.customer_trx_id=rct.customer_trx_id
AND rct.interface_header_context='ORDER ENTRY'
O2C: Accounting Entries:
Transaction Event
|
Debit
|
Credit
|
Module
|
Enter Sales Order
|
No Accounting Entry
|
Order Mgmt
| |
Book Order
| |||
Pick Release Order
| |||
Ship goods to customer
|
Cost of Goods Sold a/c
|
Inventory a/c
|
Inventory
|
Issue Invoice
|
Receivables a/c
|
Revenue a/c
|
Receivables
|
Collecting Payment
|
Cash/Bank a/c
|
Receivables a/c
|
Receivables
|


