Creating Custom Creating Custom Webadi Template in Oracle Apps in Oracle Apps
Custom Webadi creation in Oracle Apps
Webadi Summary:
Oracle Web ADI is being used by the End Users in the Oracle E-Business Suite to perform some of their day-to-day data entry tasks in the commonly used Microsoft desktop applications like Excel and upload the data to EBS.
To create the custom Web ADI, We need two responsibilities.
- Desktop Integration Manager(lets you create/Managing Integrator and parameters)
- Desktop Integrator(lets you create Document, layout, Mapping, Setup options, etc.,)
Below are the steps to create the Web ADI
1. Create database table: We use this table to load the data by using the Web ADI template.
1. Create database table: We use this table to load the data by using the Web ADI template.
Table Script:
CREATE TABLE xxcust_stage_table
(
project_number VARCHAR2(100)
,task_number VARCHAR2(100)
,description VARCHAR2(100)
);
2. Create Package: We use this package to do the validations before uploading the data to the custom table.
Package Specification:
CREATE OR REPLACE PACKAGE xxcust_webadi_demo_pkg
AS
/*
* Developer :
* Client/Project :
* Database :
* Date :
* Description : This package contains the logic for Web ADI upload
* Issue :
* Version Control:
* Author Version Date Change
* ------- ------- -------- -------
*/
PROCEDURE xxcust_webadi_stg (
icproject_number VARCHAR2
,ictask_number VARCHAR2
,icdescription VARCHAR2
);
END;
/
Package Body:
CREATE OR REPLACE PACKAGE BODY APPS.xxcust_webadi_demo_pkg
AS
/*
* Developer :
* Client/Project :
* Database :
* Date :
* Description : This package contains the logic for webadi upload
* Issue :
* Version Control:
* Authour Version Date Change
* ------- ------- -------- -------
*/
PROCEDURE project_validation (
p_project_number VARCHAR2
,p_proj_valid OUT NUMBER
)
IS
BEGIN
SELECT COUNT (1)
INTO p_proj_valid
FROM pa_projects_all pa
WHERE pa.segment1 = p_project_number
AND pa.project_status_code = 'APPROVED'
AND TRUNC (sysdate) BETWEEN pa.start_date AND NVL (pa.completion_date, TRUNC (sysdate));
END project_validation;
PROCEDURE task_validation (
p_task_number xxcust_stage_table.task_number%TYPE
,p_project_number xxcust_stage_table.project_number%TYPE
,p_task_valid OUT NUMBER
)
IS
BEGIN
SELECT COUNT (1)
INTO p_task_valid
FROM pa_tasks pt
,pa_projects_all ppa
WHERE pt.project_id = ppa.project_id
AND pt.task_number = p_task_number
AND pt.chargeable_flag = 'Y'
AND ( pt.completion_date IS NULL
OR pt.completion_date > TO_DATE (sysdate, 'dd/mm/yyyy'))
AND ppa.segment1 = p_project_number;
END task_validation;
PROCEDURE xxcust_webadi_stg (
icproject_number xxcust_stage_table.project_number%TYPE
,ictask_number xxcust_stage_table.task_number%TYPE
,icdescription xxcust_stage_table.description%TYPE
)
IS
l_projnumber NUMBER DEFAULT 0;
l_tasknumber NUMBER DEFAULT 0;
l_exptype NUMBER DEFAULT 0;
l_vatcode NUMBER DEFAULT 0;
l_gl_code NUMBER DEFAULT 0;
l_trans_date_valid CHAR;
l_trans_pa_date_valid CHAR;
l_exp_message VARCHAR2 (2000) DEFAULT NULL;
l_app_id NUMBER;
e_invalid EXCEPTION;
l_valid CHAR;
BEGIN
project_validation (icproject_number,l_projnumber);
IF l_projnumber = 0
THEN
l_exp_message := 'Project Number does not exist';
END IF;
task_validation (ictask_number
,icproject_number
,l_tasknumber
);
IF l_tasknumber = 0
THEN
l_exp_message:='Receiver Task Number does not exist';
END IF;
IF l_exp_message IS NOT NULL
THEN
RAISE e_invalid;
ELSE
INSERT INTO xxcust_stage_table
(project_number
,task_number
,description
)
VALUES (
icproject_number
,ictask_number
,icdescription
);
END IF;
EXCEPTION
WHEN e_invalid
THEN
raise_application_error (-20002, l_exp_message);
WHEN OTHERS
THEN
raise_application_error (-20000, SQLCODE || ':' || SQLERRM);
END;
END;
/
3.Create an integrator:
Navigate to -->Desktop Integration Manager - > Create Integrator

Step 1 :
Click on Create Integrator. Below page will open and enter the required details and select the checkbox ‘Display in Create Documents Page’ and click on the Next Button
Integrator Name: Custom Webadi Test Template
Internal Name: XXCUST_WEBADI_TEMPLATE
Application: Projects

Step2:
Enter the Interface Name :xxcust_webadi_demo_pkg
Interface Type: Select API Procedure from drop down list
Package Name :xxcust_webadi_demo_pkg(Give the package name as mentioned in step2)
Procedure Name:xxcust_webadi_stg(Select the main procedure name of the package:xxcust_webadi_demo_pkg)
API Returns : Select FND Message Code from the list of values. This will help to show the error message in the webadi template

Click on Apply button and the below page will open.

click on the select radio button as highlighted above and the below page will open

To create list of value for the webadi column,click on the pencil button as highlighted below and enter the details
Validation Type: Table
Id column: segment1(column name)
Meaning: segment1(column name)
Validation Entity: pa_projects_all(table name)
Lov Type : Pop up List
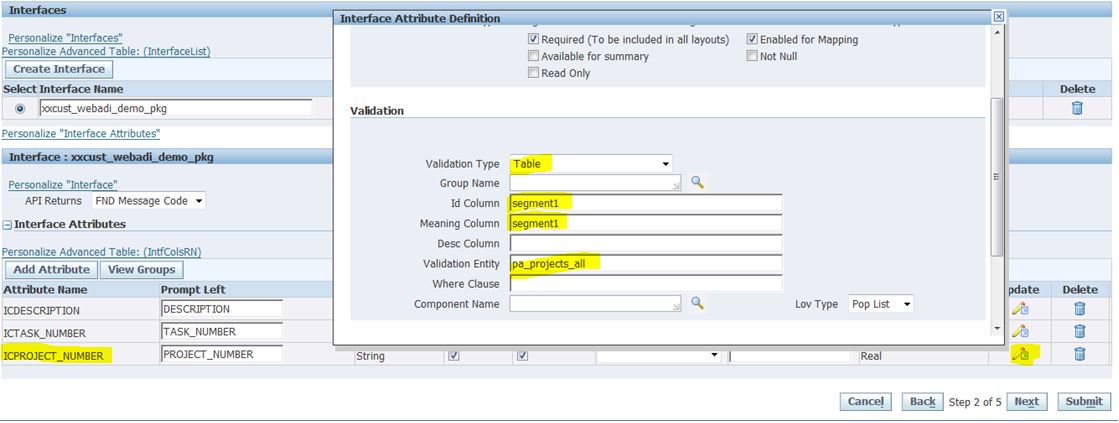
save the details and click on Next
Step 3:

Click on Next.
Step 4 :

select the From template from list of values as mentioned below

Click on create button

Click on Next
Step 5:

click on Submit

Custom integrator is ready now.
4.Create the Layout.
Navigate to Desktop Integrator --> Define Layout

Select Integrator name(We have created from the above steps) from the drop down list.

click on Go button

click on Create

Enter Layout Name and click on Next

click on Next

click on Apply

Integrator Layout is created successfully.
Download the Webadi Template
Navigate to Desktop Integrator --> Create Document

Step 1 :

select the Integrator name from drop down list and click on Next

click on Next

click button Create Document

Click on Open

Click on Allow and wait till the below Webadi template creates

Webadi Template with List of Values

No comments:
Post a Comment